Polar alignment is the act of pointing your equatorial mount’s right-ascension axis at the true celestial pole, so a single motor can follow the sky’s rotation. It is the skill that separates a frustrating equatorial mount from a rewarding one. The catch most beginners miss: Polaris is not at the pole — it sits roughly two-thirds of a degree away, so “aim at the North Star” is only a starting point, not the finish.
I polar-align every imaging session, and from my northern latitude I have it easy — Polaris rides high and obvious in my sky. Readers further south, or anyone with a roofline in the way, face the same task with fewer references, so this guide covers the rough method, the precise methods, and the software shortcuts that work even when you cannot see the pole at all. For where polar alignment fits in the bigger picture, see the telescope mount guide; this is the equatorial counterpart to the levelling-and-star routine in the GoTo alignment guide.
What Polar Alignment Actually Does
The Earth rotates once a day around an axis that points at the celestial pole. An equatorial mount works by tilting its RA axis parallel to that Earth axis — once it is, the sky’s entire apparent motion becomes a single rotation that one motor, turning at the sidereal rate of 15.04 arcseconds per second, can cancel exactly. Misalign that axis and the cancellation is imperfect, so stars slowly drift and, in long exposures, trail.
This is why polar alignment only matters for equatorial mounts. An alt-azimuth mount does not have a polar axis to align — it tracks with two motors instead, which is simpler but brings field rotation, as I explain in the equatorial versus alt-azimuth comparison. The quality of your polar alignment directly sets how long you can expose before stars trail, and how hard your autoguider has to work. Good alignment is the foundation everything else is built on; skip it and no amount of guiding fully saves the image.
How Accurate Do You Need to Be?
The required precision depends entirely on what you are doing. For visual observing, a rough polar alignment — Polaris in the polar scope, near its marked position — keeps objects in the eyepiece for many minutes and is all you need. For guided deep-sky imaging, alignment within about five arcminutes of the pole is plenty, because the autoguider mops up the small residual drift.
It is only unguided long-exposure imaging that demands truly tight alignment, down to an arcminute or better, because there is no guider to correct the slow drift that misalignment causes. This matters because beginners often agonise over perfect polar alignment when their setup does not need it, or skip it entirely when it does. Match the effort to the task: rough for visual, careful for guided imaging, obsessive only if you image unguided. The relationship between alignment, drift, and the periodic error your gears add is covered in the tracking rates and periodic error guide.
The Polar Scope Method
Most equatorial mounts have a small polar scope bored through the RA axis with an etched reticle. You set the mount’s date and time, use the reticle (or the SynScan or app routine that tells you where Polaris should sit) to place Polaris at its correct clock position around the pole, and you are roughly aligned in a couple of minutes. This is my default for a quick visual session.
The key is that Polaris is not at the pole, so you cannot just centre it — you must place it at the specific position the reticle or app indicates for your date and time, which accounts for that two-thirds-of-a-degree offset. Done carefully, the polar scope gets you well within the tolerance for guided imaging. Its limitation is obvious: you must be able to see Polaris. From a backyard where a roof or tree blocks the northern sky, the polar scope is useless and you need one of the methods below. The southern hemisphere has the same task around the much fainter Sigma Octantis, which is why southern observers often skip straight to software methods.
Drift Alignment: Slow but Foolproof
Drift alignment ignores the pole entirely and uses the sky itself as the reference. You watch a star for drift in declination: a star near the meridian and the celestial equator reveals azimuth error, and a star low in the east or west reveals altitude error. You adjust the mount’s azimuth and altitude bolts to null the drift, iterating until the star holds still. It is the most accurate method and needs no view of Polaris.
The trade is time. A careful drift alignment can take 20–40 minutes, which is why it has fallen out of favour for anything but permanent setups and observers who cannot see the pole. I have done it from sites where a building blocked the north, and it absolutely works, but on a cold night the patience runs thin. If you only image occasionally and can see Polaris, the polar scope plus a quick check is faster. If you have a permanent pier or a blocked northern horizon, drift alignment — or the software equivalent below — is the answer.
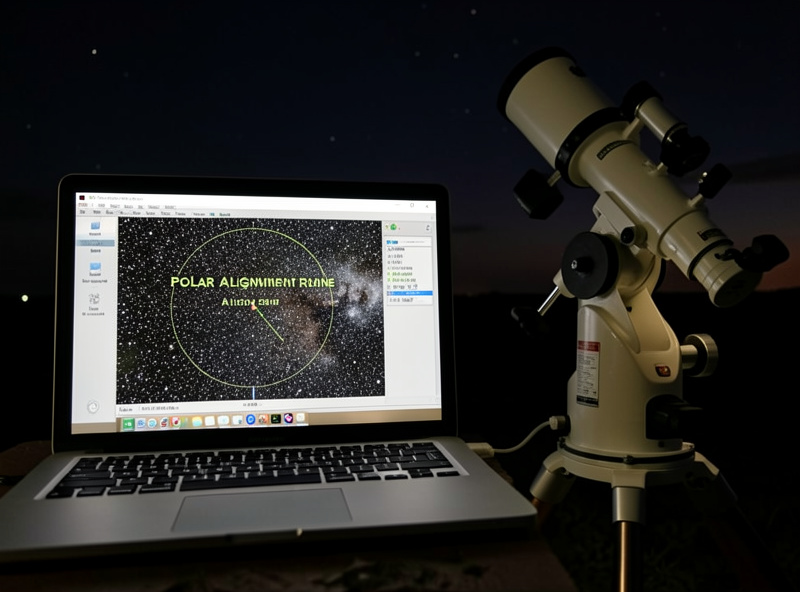
Software Polar Alignment: The Modern Shortcut
Software has made precise polar alignment fast and forgiving. SharpCap’s polar alignment routine has you rotate the RA axis about 90 degrees while it plate-solves, then shows your exact error and updates live as you turn the adjustment bolts. N.I.N.A.’s Three Point Polar Alignment and the routines built into controllers like the ASIAIR do the same thing — and crucially, none of them require you to see Polaris.
This is what I use from my dark site, and it has retired the old polar-scope squint for me. The camera identifies exactly where it is pointing, the software calculates how far the RA axis is from the pole, and I adjust the bolts watching an arcminute readout fall toward zero. It reaches drift-alignment accuracy in a fraction of the time and works through a gap in the trees as long as the camera can see some stars. If you already run a guide camera and a controller, software alignment is the clear best method — and it pairs naturally with the autoguiding workflow in the autoguiding setup guide.
Frequently Asked Questions
What does polar alignment do for a telescope?
Polar alignment points an equatorial mount’s right-ascension axis at the celestial pole so it lines up with the Earth’s rotation axis. This lets a single motor cancel the sky’s apparent motion, keeping stars fixed in the eyepiece or camera. Without it, objects drift and long exposures trail.
Is Polaris exactly at the north celestial pole?
No. Polaris sits roughly two-thirds of a degree from the true north celestial pole, so simply centring it is not accurate enough. Polar scopes and alignment apps place Polaris at a specific clock position for your date and time to account for that offset.
How accurate does polar alignment need to be?
It depends on your goal. Rough alignment is fine for visual observing. Guided deep-sky imaging needs alignment within about five arcminutes, since the autoguider corrects the rest. Only unguided long-exposure imaging requires very tight alignment of about an arcminute or better.
Can I polar align if I can’t see Polaris?
Yes. Drift alignment uses star movement rather than the pole itself, and software methods like SharpCap or N.I.N.A. Three Point Polar Alignment plate-solve the sky to calculate your error without seeing Polaris. These work well from backyards where a roof or trees block the northern horizon.
What is drift alignment?
Drift alignment is a method that watches a star for north-south drift to reveal azimuth and altitude errors in the mount, which you then null with the adjustment bolts. It is highly accurate and needs no view of the pole, but it can take 20 to 40 minutes, so it suits permanent setups and blocked horizons.