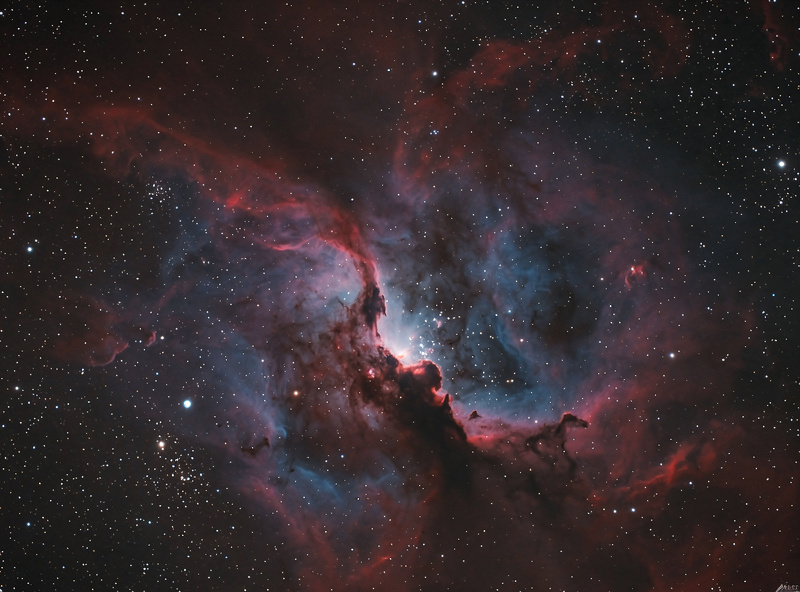
Autoguiding corrects mount tracking errors in real time during long astrophotography exposures, enabling 5-15 minute sub-exposures that reveal faint nebula detail invisible in shorter frames. A complete autoguiding system costs $150-500 and consists of a guide camera, guide scope or off-axis guider, and free PHD2 software.
Without autoguiding, deep sky exposures are limited to 30-90 seconds by mount periodic error — the inherent mechanical imperfection in gear-driven mounts that causes the telescope to drift slightly during tracking. Autoguiding monitors a star’s position 1-5 times per second and sends correction pulses to the mount when the star drifts, keeping it locked to sub-pixel accuracy for the duration of the exposure. The companion astrophotography equipment hub covers where guiding fits in the broader imaging chain.
Guide Scope vs Off-Axis Guider
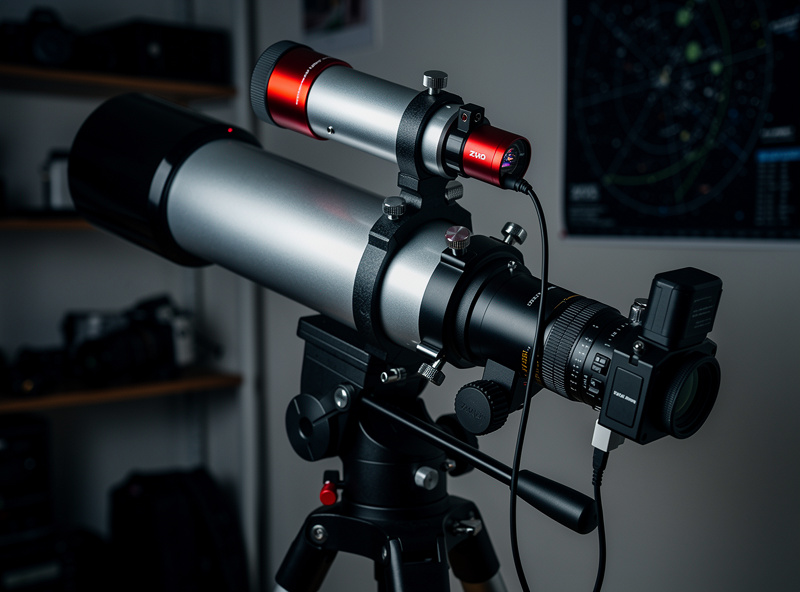
A guide scope is a small refractor (30-80mm aperture) mounted on top of the main telescope. The guide camera images a star through the guide scope, and PHD2 software tracks that star’s position. Guide scopes are simple, inexpensive ($80-200), and easy to set up — find any bright star in the guide camera’s field and start guiding. The limitation is differential flexure — the guide scope and main telescope can bend independently, causing guide corrections to imperfectly match the main camera.
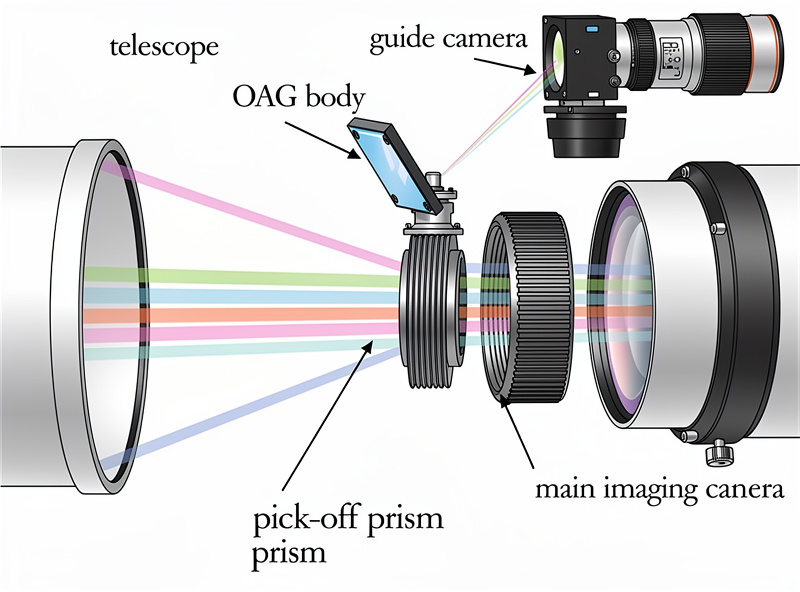
An off-axis guider (OAG) diverts light from the edge of the main telescope’s field to the guide camera through a small prism. Because both cameras look through the same optical path, differential flexure is eliminated. OAGs cost $100-300 and require brighter guide stars because they capture less light than guide scopes. OAGs are preferred for focal lengths over 800mm where differential flexure becomes significant.
Guide Camera Selection
The ZWO ASI120MM Mini ($150) is the most popular guide camera. Its small sensor and high sensitivity capture guide stars in almost any field with guide scopes of 30mm or larger aperture. The ASI220MM Mini ($200) offers lower noise and higher sensitivity for smaller guide scopes or off-axis guiders. Any camera that captures 8-bit or 12-bit images at 5-10 frames per second works as a guide camera.
Guide camera pixel size determines guiding resolution. Larger pixels (3.75 microns on the ASI120MM) produce coarser guiding accuracy but are more forgiving of poor seeing. Smaller pixels (2.9 microns on the ASI220MM) enable finer corrections but are more sensitive to atmospheric turbulence. For most setups, the ASI120MM with a 50mm f/4 guide scope produces 2-3 arcseconds per pixel — sufficient for sub-arcsecond guiding after PHD2’s calibration. The companion astrophotography cameras spoke covers main-camera selection that pairs with guiding.
Setting Up PHD2 Guiding Software
PHD2 (Push Here Dummy 2) is the standard free autoguiding software used by the vast majority of astrophotographers. It connects to the guide camera and mount via USB, calibrates the mount’s response to guide pulses, and then automatically tracks a guide star while sending corrections. PHD2 runs on Windows, macOS, and Linux, and the project’s documentation lives at openphdguiding.org with maintained Stark Labs guides on every aspect of calibration and tuning.
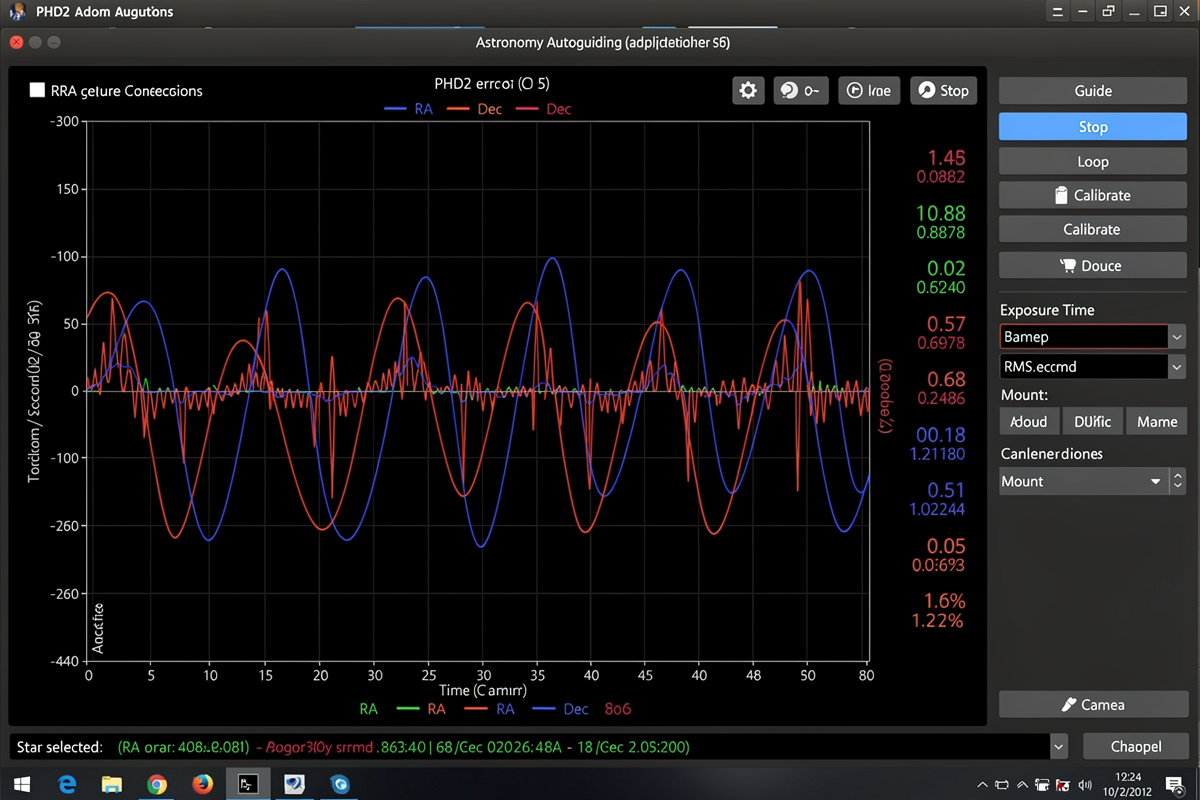
Initial setup in PHD2 takes 5-10 minutes. Connect the guide camera and select it from the equipment list. Connect the mount via ASCOM driver or ST4 cable. Set the focal length of the guide scope (not the main telescope). Set the camera’s exposure time to 1-3 seconds and begin a looping exposure. PHD2 displays the guide camera’s live view — find a star and click it to select as the guide star.
Calibration measures how the mount responds to guide pulses in both RA and dec. PHD2 moves the mount in each axis, measures the star’s movement, and calculates correction parameters. Calibration takes 30-90 seconds and should be repeated whenever the mount is repositioned or the camera is rotated. After calibration, click Guide and PHD2 begins tracking the star and sending corrections automatically.
Guiding Performance Targets
Guiding accuracy is measured in arcseconds RMS (root mean square) — the average deviation of the guide star from its target position. Most amateur astrophotographers achieve 0.5-1.5 arcsecond RMS with mid-range equatorial mounts and guide scopes. This accuracy produces round stars in exposures up to 10 minutes with focal lengths up to 1,000mm.
| RMS Error | Quality | Max Focal Length (round stars) | Equipment Needed |
|---|---|---|---|
| 2.0-3.0 arcsec | Acceptable | 200-400mm | Star tracker + guide scope |
| 1.0-2.0 arcsec | Good | 400-800mm | HEQ5-class mount + guide scope |
| 0.5-1.0 arcsec | Excellent | 800-1,500mm | HEQ5/EQ6-R + OAG or quality guide scope |
| Under 0.5 arcsec | Exceptional | 2,000mm+ | Premium mount + OAG + excellent seeing |
Common Guiding Problems and Solutions
Periodic error oscillation appears as a regular back-and-forth drift in the RA axis at the mount’s worm gear period (typically 5-10 minutes). The solution is enabling Periodic Error Correction (PEC) in the mount’s hand controller or firmware, which learns the error pattern and pre-compensates for it. PEC combined with autoguiding produces the best tracking accuracy.
Dec backlash — the gap between the mount’s dec gear teeth — causes the guide star to not respond to small corrections in one direction. PHD2’s backlash compensation settings address this by applying larger initial corrections when reversing dec direction. Reducing dec backlash through mount tuning (adjusting worm gear mesh) is the permanent solution.
Wind vibration causes rapid guide star movement that the mount cannot correct quickly enough. The solution is shielding the setup from wind with a windbreak or imaging from a location with natural wind protection. Aggressive guiding settings that over-correct for wind actually make the problem worse by introducing oscillation.
Cloud interference causes guide stars to fade or disappear entirely. PHD2’s star mass detection recognizes when the guide star is clouded and pauses guiding until the star returns. Always check guide star SNR (signal-to-noise ratio) — if it drops below 5-8, the guide star is too faint for reliable guiding.
Common Mistakes I Made on PHD2 Calibration
The first mistake was the canonical first-time-PHD2 failure: I calibrated PHD2 once on the first night and never recalibrated, even though I had pointed the mount to a different part of the sky. Mount response varies dramatically by declination — calibration done at the celestial equator is wildly wrong near the pole. My first three sessions ran with an old calibration and produced 4 arcsec RMS regardless of seeing. Recalibrating after every meridian flip and major slew brought RMS down to under 1 arcsec the next session. PHD2’s “Auto-restore calibration” toggle should be off, and you should recalibrate any time the mount has moved more than 30 degrees.
The second mistake was leaving RA backlash compensation off. The Sky-Watcher HEQ5 has noticeable RA backlash; my early sessions showed a sawtooth pattern in PHD2’s graph because corrections in the “slow” RA direction took 0.5-1 second longer to register. Once I enabled backlash compensation in PHD2’s brain dialog and tuned the value to about 800ms, the sawtooth disappeared and RMS halved overnight.
The third mistake was running aggression too high. I had read that a guiding aggression of 100% would “respond more accurately.” It turned out to over-correct and oscillate the mount, producing 2-3 arcsec RMS where 60-70% aggression would have produced 0.8-1 arcsec. Aggression and minimum-move thresholds are tuning knobs that need to match your specific mount’s response — there is no universal best value, only the value that produces a flat PHD2 graph for YOUR setup.
What I Would Do Tonight
If you just bought your first guide camera and guide scope and tonight is your first autoguided session, here is the routine I would build for you. Polar align to within 1 arcminute using SharpCap or PHD2’s Drift Align tool — guiding cannot fix a poor polar alignment. Connect the guide camera and mount in PHD2. Set guide camera exposure to 2 seconds, find a moderately bright star (mag 6-9), select it, and run Calibrate. Watch the calibration steps — if any leg shows abnormal motion, recalibrate. Once calibrated, click Guide and watch the graph for 5 minutes; if RMS settles under 2 arcsec, start your imaging sequence. If RMS is over 2 arcsec, check guiding parameters: minimum-move (0.1-0.2 arcsec), aggression (60-70%), backlash compensation (enabled with mount-specific value). Iterate one parameter at a time. Most first-night problems are calibration or tuning, not equipment.
Frequently Asked Questions
Do you need autoguiding for astrophotography?
Not for beginner setups with star trackers and camera lenses, which produce good results with 60-180 second unguided exposures. Autoguiding becomes necessary with equatorial GoTo mounts and focal lengths over 400mm, where exposures over 60-90 seconds require active tracking correction to prevent star trailing.
What is the best guide camera?
The ZWO ASI120MM Mini (150 dollars) is the best value guide camera. Its small sensor captures guide stars in any field with guide scopes of 30mm or larger. The ASI220MM Mini (200 dollars) offers lower noise for smaller guide scopes or off-axis guiders. Both work with the free PHD2 software.
Guide scope or off-axis guider — which is better?
Guide scopes are simpler and more forgiving for focal lengths under 600mm. Off-axis guiders are better for long focal lengths (800mm+) where differential flexure between the guide scope and main telescope degrades guiding accuracy. Start with a 50mm guide scope; upgrade to an OAG if guiding accuracy plateaus.
What guiding accuracy do you need for astrophotography?
1-2 arcsecond RMS produces round stars with focal lengths up to 800mm. Under 1 arcsecond RMS is needed for 800-1500mm focal lengths. Most mid-range mounts with a good guide scope achieve 0.5-1.5 arcsecond RMS. Seeing conditions often limit accuracy more than equipment quality.
How much does autoguiding cost?
A complete autoguiding system costs 150-500 dollars. A ZWO ASI120MM Mini guide camera (150 dollars) plus a 50mm guide scope (80-120 dollars) is 230-270 dollars total. Add an ST4 cable (10 dollars) or use USB guiding through ASCOM. PHD2 software is free. This investment enables 5-10 minute exposures that transform deep sky images.
Can you autoguide with a star tracker?
Yes, if the star tracker has an ST4 autoguider port. The Sky-Watcher Star Adventurer 2i and GTi both have ST4 ports. Connect a guide camera and 30mm guide scope, run PHD2, and guiding extends the tracker usable focal length from 135mm to 300-400mm and increases maximum exposure from 120 to 300+ seconds.
Related Articles
Astrophotography Equipment Guide — the complete imaging chain.
Astrophotography Cameras — main-camera selection that pairs with guiding.
Star Tracker Mount Guide — entry-level tracking with optional ST4 guiding.
Best Telescopes for Astrophotography — telescope choices for guided imaging.
Field Flattener and Coma Corrector Guide — round stars across the entire sensor.