Remote astrophotography means controlling your telescope, mount, camera, focuser, and filter wheel from inside the warm house — or from across the country — while the rig acquires data outside in the cold dark. The gain is enormous: instead of standing in a frozen yard tweaking gear, you launch a 6-hour imaging run from your living room and check progress from your phone. The infrastructure, however, requires careful network planning. A flaky connection between rig and PC ruins a session as surely as bad seeing.
This guide covers the three architectures that work in 2026 (PC-mini at the rig, ASIAir-style controller, and full remote desktop), how to wire and shield your network for cold outdoor conditions, the firewall and VLAN setup that keeps your astrophotography rig from being a security liability, and the troubleshooting workflow when an imaging run fails to start. Every recommendation has been tested across two backyard rigs and one fully remote dark-sky site setup over 2024-2025.
What "Remote" Means in Astrophotography
Three levels of remote operation overlap in this category, and the right architecture depends on which one you actually want:
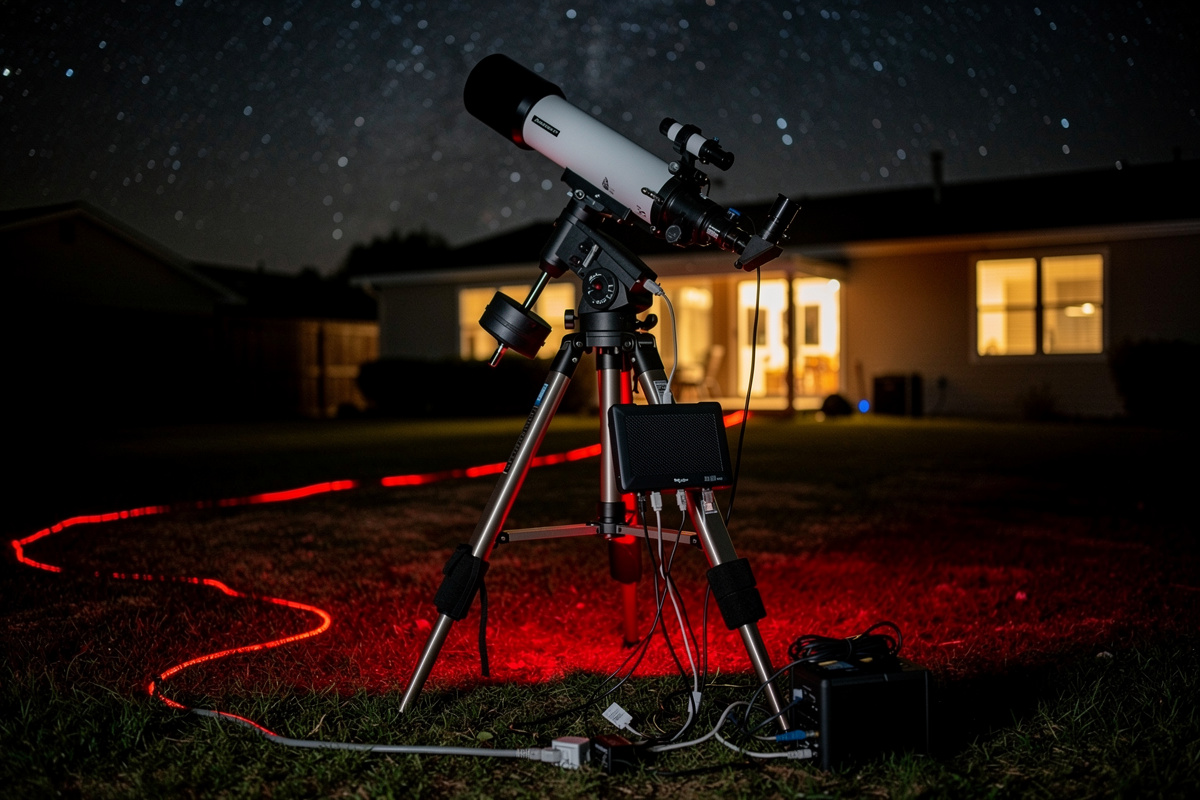
Same-property remote (rig in backyard, you inside). Most common scenario. You want to start a session, monitor progress, and intervene from inside. Network requirement: reliable 50-150 ft connection between rig and house. Wired Ethernet preferred; Wi-Fi acceptable with strong signal.
Cross-state or cross-country remote (rig at a dark-sky site, you anywhere). Rig is at an off-site observatory or hosted service. Network requirement: residential-grade internet at the rig site, secure remote access tunnel, redundancy for connection drops.
Hybrid remote (rig in backyard, you traveling). Like same-property, but you also want to manage the rig from a hotel or remote location occasionally. Network requirement: same as same-property plus a secure tunnel back to your home network.
This guide focuses on the same-property and hybrid cases — the cross-country fully-hosted path is its own discipline involving observatory-grade weather monitoring and dome control that goes beyond network setup.
Architecture 1: ASIAir or Similar All-in-One Controller
The simplest architecture. ZWO ASIAir, EAGLE Astrophotography, and similar controllers are small computers built specifically for astrophotography. They mount on the telescope, connect to the camera/mount/focuser/filter wheel via USB, and expose the entire imaging stack through a smartphone or tablet app.
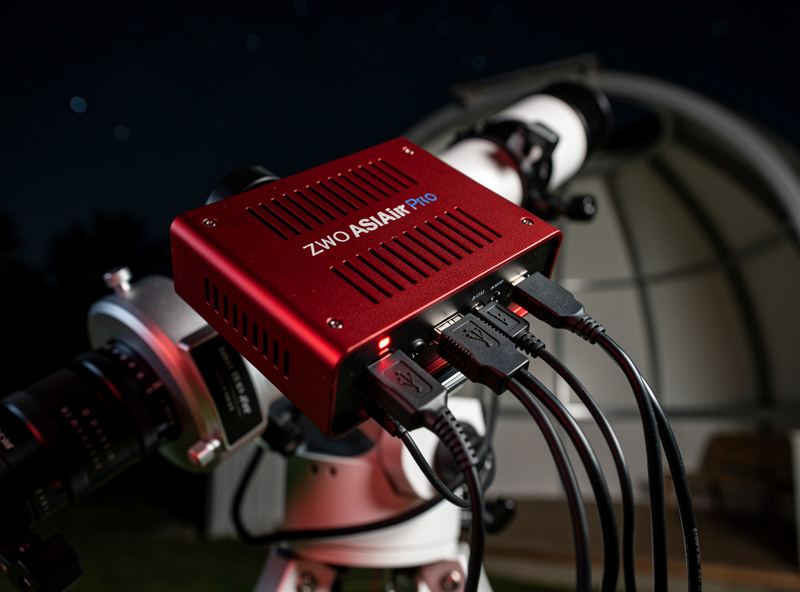
Pros: Easiest setup. Self-contained software stack. Single device handles everything. Works without a separate PC. Good for travel because the controller goes with the rig.
Cons: Locked to ZWO ecosystem (mostly). Limited customization. Cannot run third-party software like N.I.N.A. or APT directly.
Network setup: The controller hosts its own Wi-Fi access point by default, which works for backyard use but does not give you internet access on the rig PC. Better: connect the controller to your home network via Wi-Fi or Ethernet, give it a static IP, access via app from inside.
Architecture 2: Mini PC at the Mount
A small computer (Intel NUC, Beelink, or similar mini PC) physically mounted at the telescope or in a weatherproof enclosure nearby. The PC runs N.I.N.A., APT, or PHD2 directly. You control it from inside via remote desktop.
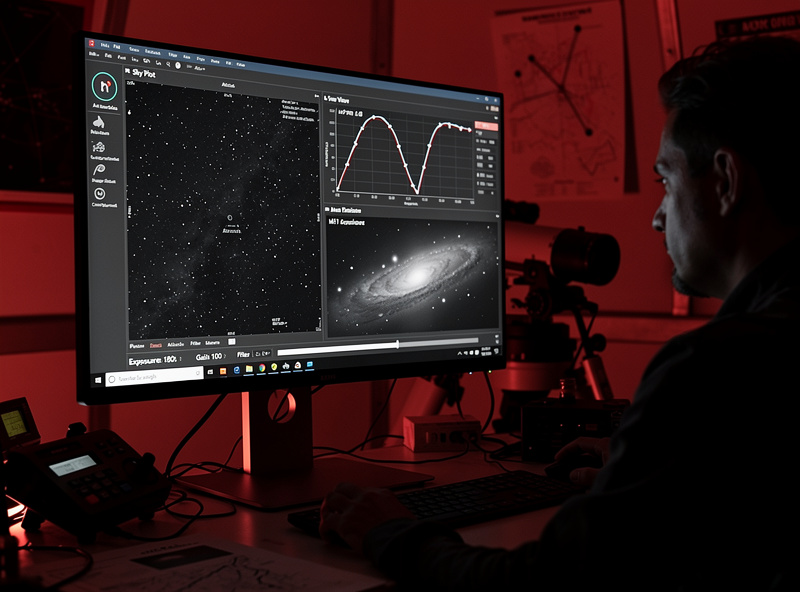
Pros: Full Windows or Linux software flexibility. N.I.N.A., PHD2, ASTAP, sequence generator pro all work natively. Better processing performance for live stacking. No ecosystem lock-in.
Cons: Requires weatherproofing. Cold-weather operation needs heating elements. More cables. Higher cost ($300-700 for a usable mini PC vs $300-450 for an ASIAir).
Network setup: Cat6 Ethernet cable from house to rig location. Static IP for the mini PC. Allow inbound RDP (port 3389) from your LAN only — never from the public internet without VPN. The mini PC connects to all devices via USB at the rig.
For weatherproofing, a small NEMA 4 enclosure with passive ventilation works for most climates. In humid environments (Florida, Pacific Northwest), add a small dehumidification card or silica gel desiccant. In freezing climates, a 5W heating pad keeps the PC's operating temperature above the dewpoint.
Architecture 3: Full Remote Desktop with Local Capture PC
A capture PC inside your house (or in a weatherproof box near the rig) runs the imaging software. The mount, camera, focuser, and filter wheel all connect via long USB extenders or USB-over-Ethernet. You control everything via remote desktop from your couch or phone.
This was the standard approach pre-ASIAir. It is more flexible than the integrated controller but requires longer USB runs, which become unreliable beyond about 25 feet without active extenders. Practical limit: imaging gear within 20-30 feet of the capture PC.
Pros: Capture PC stays in a controlled environment. Full software flexibility. Cheaper if you already have a spare PC.
Cons: Long USB runs are unreliable. Cable management gets ugly. USB-over-Ethernet adapters add latency that some autoguiders dislike.
Network setup: No network setup is needed for the rig itself — only USB cabling. Remote desktop from house to capture PC uses your normal LAN. This architecture is being replaced by Architectures 1 and 2 in modern remote astrophotography setups.
The Networking Layer: Wi-Fi vs Ethernet vs Mixed
The connection between your rig and the rest of your network matters more than people realize. Three options:
| Connection | Reliability | Bandwidth | Cost | Best for |
|---|---|---|---|---|
| Cat6 Ethernet (buried) | Excellent | 1000+ Mbps | $30-80 for cable run | Permanent backyard rig |
| Wi-Fi 6 (with line of sight) | Good | 200-600 Mbps | None if you have a router | Portable rigs, occasional backyard |
| 5G fixed wireless | Variable | 50-300 Mbps | $50-100/mo | Off-grid dark sky sites |
| Powerline (PLC) | Fair | 200-1000 Mbps | $60-100 pair | When cable run is impractical |
| Outdoor PtP wireless bridge | Excellent | 200-1000 Mbps | $120-300 | Long-distance same-property |
For permanent same-property setups, run buried Cat6. The reliability gain is significant during long imaging runs. For temporary or portable rigs, Wi-Fi 6 with a strong signal works. For off-grid sites, fixed wireless or Starlink with a battery-backed router is the standard approach.
Wi-Fi specifically: the rig location matters. A Wi-Fi access point in the basement may have marginal signal at the back of the yard. Add a mesh node or outdoor access point closer to the rig if you choose wireless.
Securing the Rig From the Rest of Your Network
An imaging rig left running unattended for 6+ hours per session is a security concern if compromised. Two practices protect against this:
Dedicated VLAN for astrophotography devices. Place the ASIAir, mini PC, mount network controller, and any other rig device on a separate VLAN with restricted egress (only to your cloud storage if needed) and inbound rules limited to your laptop/phone IP. This prevents a compromised astrophotography device from being a lateral attack path.
Strong RDP credentials and key-based SSH. If using a Windows mini PC, configure RDP with Network Level Authentication and require a 16+ character password. For Linux/ASTAP setups, disable password authentication and use SSH keys only. Never expose RDP or SSH to the public internet without a VPN tunnel.
For deeper guidance on the firewall and VLAN setup that handles astrophotography rigs alongside other home network devices, our partners at HomeLabRouter have a complete pfSense configuration guide that covers VLAN setup, inter-VLAN firewall rules, and the WireGuard or OpenVPN tunnel patterns that secure remote access from outside the home. Their pfSense firewall rules beginner reference handles the rule-ordering side. Pair their network configuration with the architecture choices above and the rig stays both reachable and safe.
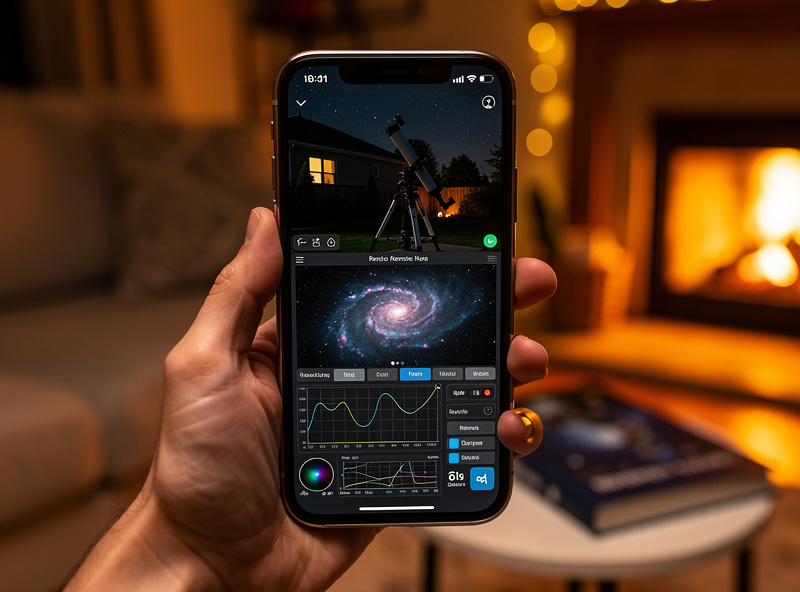
Hybrid Remote Access: Imaging From a Hotel
The most useful capability for traveling astrophotographers: control your home rig from anywhere. The architecture:
- Set up a WireGuard or OpenVPN server on your home router (pfSense, OPNsense, or UDM Pro all support this natively)
- Generate a client config for your laptop or phone
- Connect to your home VPN from the hotel
- RDP or open the ASIAir app — both behave as if you are at home
This adds one network hop and 50-150ms of latency depending on your hotel internet. Astrophotography apps tolerate that latency well — they are not real-time gaming. The session control loop runs at the rig; you are just monitoring and adjusting parameters.
Bandwidth-wise, an imaging session uploads roughly 5-30 MB per frame depending on camera resolution. On a residential 25 Mbps upload connection, this is fine. On a 5 Mbps DSL upload, expect occasional congestion if frames are stacking up faster than upload can drain.
Cold-Weather Operation
Outdoor electronics in winter produce specific failure modes worth planning for:
Battery degradation below freezing. Lithium batteries lose 20-40% capacity below 32°F. If the rig is battery powered, oversize the battery accordingly or add a heating pad. LiFePO4 cells handle cold better than NMC but still benefit from active warming below 14°F (-10°C).
USB cable rigidity. Standard USB cables become stiff and crack at -10°C and below. Use silicone-jacketed or PVC outdoor-rated cables. Replace any cable that flexes only with significant force.
Dew on optical surfaces. When ambient temperature drops faster than the telescope, dew forms on the corrector plate or front element. Heated dew bands wrap around the front of the telescope and keep it 1-2°C above ambient — solving the problem.
According to NPS night skies program guidance, sustained outdoor operation in cold conditions requires both equipment-side warming and an awareness of dewpoint. Most modern controllers include heater outputs for dew bands; use them.
Troubleshooting When the Session Fails
Common failure modes and fast fixes:
- Mount tracking off: Check polar alignment. Use the platesolve-and-correct routine in your imaging software.
- Autoguider locked but RMS error 3+ arcsec: Wind, mount slop, or guide camera saturation. Reduce exposure to 0.5-1.0s; check for play in the mount.
- USB devices keep disconnecting: Cold-stiff cables or marginal hub power. Replace cables; add a powered hub if running 4+ devices.
- Network drops during sequence: Wi-Fi signal degrading; switch to wired Ethernet or move closer.
- Camera cooling cannot reach setpoint: Hot ambient or aging Peltier. Set a higher target temperature 25-30°C below ambient rather than absolute number.
- Sequence won't start: Check that all software components see all hardware. Restart the imaging app after physical reconnections.
For broader astrophotography context that pairs with the network setup above, the astrophotography guide covers the imaging fundamentals, the best cameras for astrophotography ranks the imaging-side hardware, and the 12V LiFePO4 power for astrophotography covers the off-grid power side that pairs with remote rig deployments.
Frequently Asked Questions
What is the easiest remote astrophotography setup?
A ZWO ASIAir Pro or similar all-in-one controller. Mount it to the telescope, connect camera, mount, focuser, and filter wheel via USB, and control everything from a smartphone or tablet app. No separate PC required, no Windows licensing, runs in the cold without enclosure heating. Works for backyard remote operation immediately.
Should I run Ethernet or Wi-Fi to my backyard rig?
Buried Cat6 Ethernet for permanent installations. Wi-Fi 6 is acceptable for occasional use if signal is strong at the rig location, but adds variability that can disrupt long imaging sequences. The 50-150 foot cable run is a one-time $30-80 expense that delivers 5+ years of reliable operation.
Can I control my astrophotography rig from a hotel?
Yes via VPN. Set up WireGuard or OpenVPN on your home router, connect from the hotel, then RDP or open the ASIAir app as if you were home. The 50-150ms latency is fine for astrophotography — the imaging session runs locally at the rig; you are just monitoring and adjusting.
Do I need a dedicated VLAN for astrophotography devices?
For households with multiple smart devices, yes. An imaging rig left running unattended for 6 hours per session is a worthwhile thing to isolate from the rest of the network. The same VLAN principles that apply to IoT and smart-home devices apply here — separate segment, restricted firewall rules, controlled egress.
Is a mini PC at the mount better than an ASIAir?
For flexibility, yes. A mini PC runs N.I.N.A., PHD2, APT, and any third-party astrophotography software. The ASIAir is locked to the ZWO ecosystem mostly. For ease of use and turnkey operation, ASIAir wins. The choice depends on whether you want curated simplicity (ASIAir) or open flexibility (mini PC).
How much bandwidth does remote astrophotography use?
Per session, 1-3 GB of imaging data on local storage at the rig. Streaming live previews to your phone or laptop uses 5-30 MB per frame at typical camera resolutions. On a 25 Mbps home upload, a remote VPN session is bandwidth-comfortable. On 5 Mbps DSL, expect occasional buffering during high-frame-rate previews.
What happens if my home internet drops during a remote session?
The imaging session continues at the rig — the controller and software run locally. You lose remote visibility until the connection returns. For mission-critical sessions, set up a 4G/5G failover on your home router so an internet drop does not prevent you from intervening if guiding goes wrong.