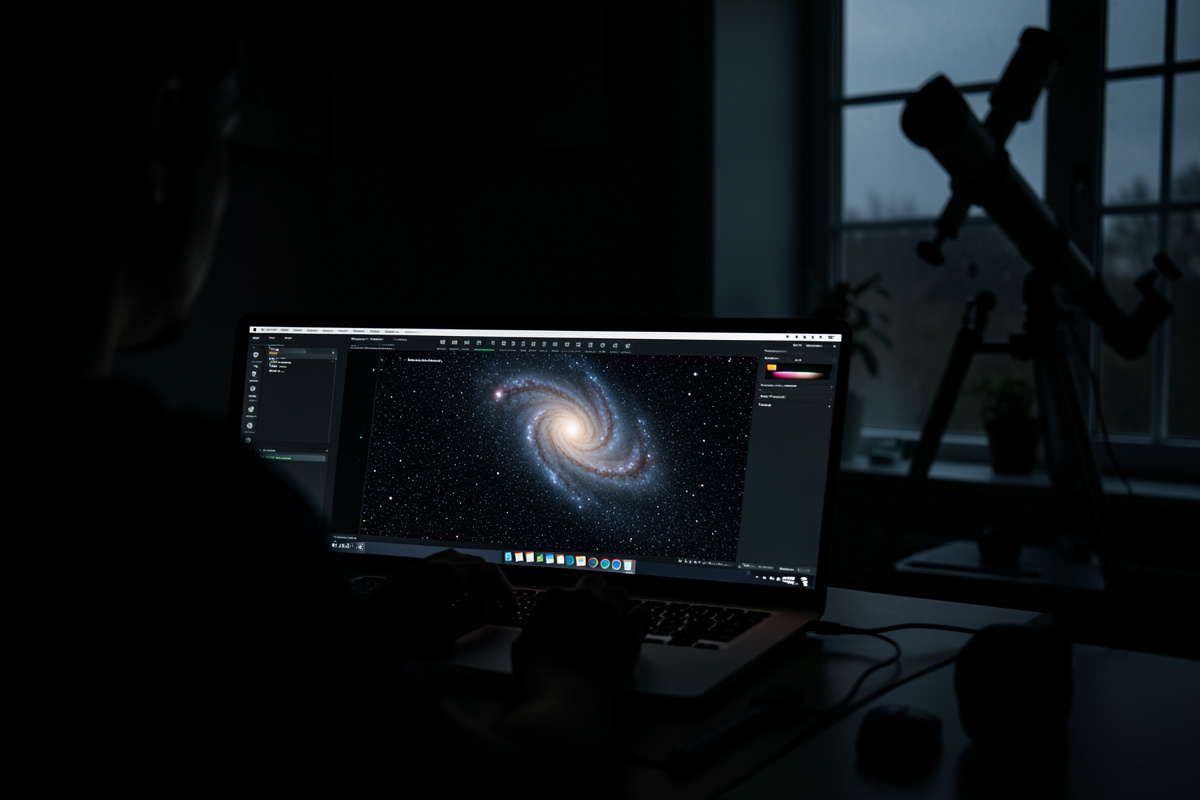
Astrophotography processing is where a night of data becomes an image. A single raw sub-exposure of a galaxy looks like grey noise with a faint smudge; the structure only emerges after you stack dozens of frames and stretch the result. Expect to spend roughly as many hours at the keyboard as you did under the sky.
That ratio surprises everyone who comes from daytime photography. In my own deep-sky work the capture is the easy part once the rig is dialed in — the mount guides, the camera cools, the frames pile up. The skill that separates a muddy first attempt from a clean, color-true image is processing: calibration, integration, stretching, color, noise control, and sharpening, applied in that order and with restraint. This guide walks the whole pipeline the way I actually run it from a suburban Bortle 5 backyard and a darker Nordic site, then points you to the deep-dive spokes for each stage.

What Image Processing Actually Does
Processing has one job: pull a faint signal out of overwhelming noise without inventing detail that was never there. Deep-sky targets are dim — a spiral galaxy might deliver a few photons per pixel per minute against a sky glow that is far brighter. The honest answer to “why so many sub-frames?” is signal-to-noise ratio, and SNR scales with the square root of total integration time.
That square-root relationship is the single most useful number in the hobby. Double your total exposure and noise drops by about 1.4x, not 2x. Going from one hour to four hours halves your noise; getting another halving means sixteen hours. This is why I plan targets across multiple nights and why “just process it harder” can never substitute for collecting more photons. Processing reveals the signal you captured. It cannot create signal that was never recorded, and every tool that claims to is really just smoothing noise and hoping you do not look closely.
The Processing Pipeline, In Order
Every credible workflow — in PixInsight, Siril, StarTools, or anything else — runs the same logical sequence. The tools differ; the order does not. Calibrate, then integrate (stack), then color and gradient work while the image is still linear, then stretch, then refine. Skip a step or reorder it and you bake in errors you cannot remove later.
Here is the spine of the workflow, with the stages I treat as non-negotiable marked. Each later section expands one of these, and several have full guides of their own.
| Stage | What it does | When (image state) | Skippable? |
|---|---|---|---|
| Calibration | Removes sensor artifacts using darks, flats, bias | Linear | No |
| Registration | Aligns every sub to a reference frame | Linear | No |
| Integration (stacking) | Averages frames to raise SNR, rejects outliers | Linear | No |
| Gradient removal | Flattens light-pollution and vignetting gradients | Linear | Rarely |
| Color calibration | Sets a neutral, physically sensible white balance | Linear | No (color cams) |
| Stretching | Maps the dim linear data to a viewable range | Linear → nonlinear | No |
| Noise reduction | Smooths background noise, protects detail | Mostly nonlinear | No |
| Sharpening / deconvolution | Recovers fine structure blurred by seeing/optics | Both (depends on tool) | Optional |
Notice how much happens while the data is still linear — that is, before stretching, when the numbers in the file are still proportional to the photons that hit the sensor. Color calibration, gradient removal, and deconvolution all want linear data because the math behind them assumes it. Stretch first and you break those assumptions. This is the mistake I see most often in first images: people grab the raw stack, yank the curve up to see the galaxy, and only then try to fix color and noise on data that is no longer mathematically honest.
Calibration Frames: The Unglamorous Foundation
Calibration is the step beginners skip and regret. Your sensor has a fixed pattern of hot pixels, amp glow, and dust shadows, plus vignetting from the optical train. Calibration frames measure those defects so the software can subtract them out, leaving cleaner light frames before anything else happens.
There are three families. Darks are exposures with the same length, temperature, and gain as your light frames but with the scope capped — they record thermal signal and hot pixels. A cooled camera is worth the money here precisely because it lets you build a reusable dark library at a set temperature; my DSLR darks had to be shot the same night because the sensor temperature wandered. Flats are short exposures of an evenly lit panel that map vignetting and dust motes so they can be divided out; they are the single most impactful calibration frame for a clean background. Bias (or dark-flats) capture the sensor read pattern. Shoot at least 20-30 of each — calibration masters need their own SNR, and a noisy dark adds noise rather than removing it. A simple flat-field EL panel that fits over the dew shield makes flats repeatable; you can find tracing light panels suited to flats for the cost of a couple of eyepieces.
As an Amazon Associate I earn from qualifying purchases.
Stacking: Turning Many Frames Into One
Stacking — properly, registration plus integration — aligns your calibrated subs and combines them so random noise averages toward zero while the real signal reinforces. Pixel-rejection algorithms during integration also throw out satellite trails, cosmic-ray hits, and the odd plane, which is why a single trailed frame does not ruin a stack.
The integration method matters more than beginners expect. A plain average is mathematically optimal for pure noise but keeps every airplane; sigma-clipping rejection (Winsorized sigma clipping is my default for 20+ frames) discards statistical outliers per pixel before averaging. With fewer than about 15 frames, rejection has too little data to judge outliers and you may do better with a gentler method. I cover frame counts, rejection settings, drizzle, and dithering in depth in the astrophotography stacking guide. The short version: dither between subs at capture so rejection has something to work with, collect more frames than you think you need, and never stack uncalibrated data.
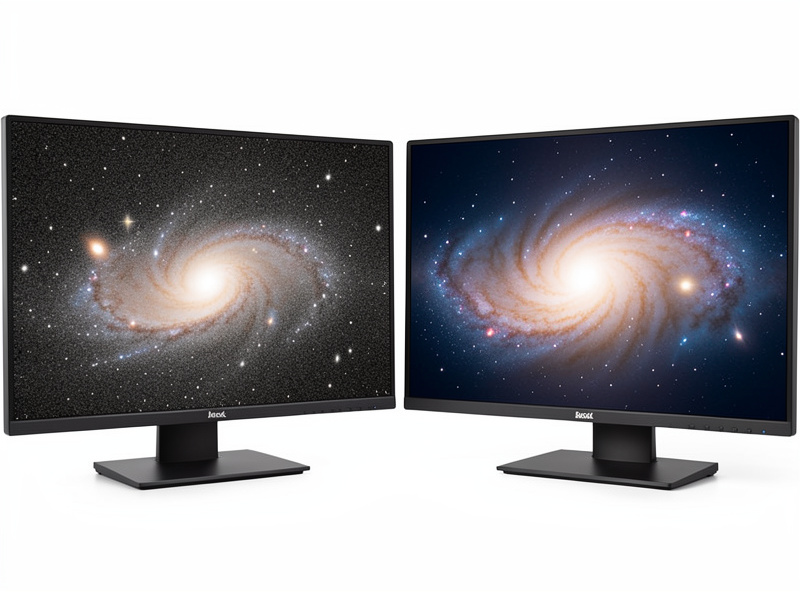
Stretching: From Linear Data to a Visible Image
A freshly stacked deep-sky image looks black. The signal is there, packed into the bottom few percent of the histogram, and stretching is the nonlinear curve that lifts those dim values into a viewable range while holding the bright stars back from blowing out. This is the step where the image first looks like something.
Two ideas keep stretches honest. First, do your linear-stage work — color, gradients, deconvolution — before you stretch, because stretching is a one-way door. Second, use a screen-transfer-style preview (an autostretch that changes only the display, not the data) to judge your linear processing without committing to it. Every serious tool has this: PixInsight’s ScreenTransferFunction, Siril’s autostretch, StarTools’ tracking model that defers the stretch entirely. When you do commit the stretch, go gentler than feels right — you can always push contrast later, but an over-aggressive stretch clips shadow detail and amplifies every bit of noise you were about to deal with.
Color Calibration: Getting White Right
Color is where amateur images most often go wrong — green-cast nebulae, orange skies, blue halos. The fix is a physically grounded white balance rather than eyeballing it. Modern tools use the stars themselves: a broadband photometric calibration measures real star colors against a catalog and sets your white point from physics, not taste.
From a light-polluted backyard, gradient removal has to come first or color calibration will chase an orange sky-glow instead of the target. Once the background is neutral and flat, photometric color calibration gets galaxies and star fields right on the first try far more reliably than the older “background neutralization plus manual white reference” dance. Narrowband data is a different animal — there you are mapping emission lines to palette colors deliberately, not reproducing true color. I walk through both broadband and narrowband approaches, plus fixing a stubborn green cast, in the color calibration guide.
Noise Reduction: Smoothing Without Smearing
After stretching, the noise you collected gets stretched too, and the faint outer regions of a galaxy or nebula look grainy. Noise reduction smooths that background while protecting the structure and stars you worked to capture. The discipline is restraint: over-smoothed astrophotos have a plastic, waxy look that is an instant tell.
The best noise reduction is collecting more data, full stop — remember the square-root rule. After that, modern tools (including the AI-based denoisers that have changed this stage in the last few years) work on a mask so that they hit the dim background hard and leave bright detail alone. I always reduce noise on a luminance mask that excludes stars and the brightest galaxy core, and I do it in stages rather than one heavy pass. The noise reduction guide covers masking, the order relative to stretching, and how to tell genuine smoothing from detail destruction.
Sharpening and Deconvolution: Recovering Detail
Seeing, tracking error, and your optics all blur the image slightly. Sharpening and deconvolution try to claw some of that back. Deconvolution is the heavyweight — it mathematically reverses a measured blur (the point-spread function) and genuinely recovers resolution, but only on linear data and only with a good star-based PSF, or it generates dark rings and amplifies noise.
Lighter sharpening (wavelets, multiscale tools, high-pass methods) runs after stretching and adds local contrast to bring out structure. The trap is the same as noise reduction in reverse: too much sharpening creates harsh edges, ringing around stars, and noise that masquerades as detail. I sharpen on a mask that protects the background and stars, and I judge it at 100% zoom, not fit-to-screen. The sharpening guide separates true deconvolution from cosmetic sharpening and shows where each belongs in the pipeline.
Choosing Your Processing Software
The software question dominates beginner forums, and the honest answer is that all the major packages can produce excellent images — the bottleneck is the operator, not the tool. That said, they trade off cost, learning curve, and how much they do for you. Here is how the main options compare for someone starting deep-sky processing.
| Software | Cost | Learning curve | Best for |
|---|---|---|---|
| PixInsight | One-time licence (~$300) | Steep | Full control, every stage, the long haul |
| Siril | Free / open source | Moderate | Capable free pipeline, scriptable, great value |
| StarTools | Low one-time licence | Moderate (different model) | Noise-tracking workflow, fast clean results |
| Deep Sky Stacker | Free | Low (stacking only) | Stacking step, paired with another editor |
| Astro Pixel Processor | Subscription or licence | Moderate | Mosaics, multi-session integration |
My practical advice: start free. Stack in Siril or Deep Sky Stacker, learn what calibration and integration actually do, and only pay for a tool when you hit its ceiling. Most people never need to. If you want the deepest control and plan to image for years, PixInsight is the reference standard — and many imagers run Siril for stacking and PixInsight for finishing. The two get compared endlessly; I lay out exactly who should pick which in the PixInsight vs Siril comparison. StarTools deserves its own look because its “track the noise statistics through the whole session” model is genuinely different from everyone else — the StarTools processing guide covers that workflow end to end.
A Realistic Workflow From My Rig
To make the pipeline concrete, here is how a typical broadband galaxy session goes for me, shooting a cooled color camera through the 100mm apo on a guided equatorial mount. Capture in N.I.N.A. with dithering on, guiding in PHD2, plate-solved framing. The next day: build calibration masters, calibrate and register the lights, integrate with Winsorized sigma clipping. Then, still linear, crop the stacking artifacts off the edges, remove the light-pollution gradient, run photometric color calibration, and apply deconvolution with a star-derived PSF on a star mask.
Only then do I stretch — gently, with a masked-stretch approach that holds the core back. Post-stretch comes staged noise reduction on a background mask, contrast and saturation tuning, masked sharpening at 100% zoom, a final star-size pass, and a last look at the background neutrality. Start to finish that is two to four hours for a clean result, more if the data is marginal. The acquisition side — the cameras, the guiding, the field flattener — lives in the imaging chain guide, and the guiding specifics are in the PHD2 autoguiding guide. Processing only works if the data underneath it is sound.
The Nordic-Latitude Reality
Where you image changes how you process. From my high-latitude site, summer simply has no astronomical darkness for weeks — the sky never fully drops below twilight — so deep-sky imaging compresses into autumn through spring, when the nights run long and brutally cold. That is a gift for data quality: long dark windows mean more integration time per target in a single night, and cold ambient temperatures keep sensor noise down before the camera’s cooler even kicks in.
The flip side is that targets ride low and seeing is often poor, which punishes aggressive sharpening — you cannot deconvolve detail that the atmosphere smeared away. So my northern workflow leans on integration time and gentle, restrained sharpening rather than heroic recovery. It is the same lesson the whole hobby teaches: the same setup-and-tweak discipline I bring to hydroponics or a 3D printer shows up here too, where the trap is optimizing the wrong thing — chasing a sharper sharpen instead of collecting another two hours of clean photons.
Common Beginner Mistakes
A few errors show up in nearly every first deep-sky image, and all of them are processing-order or restraint problems rather than gear problems. Skipping calibration frames and wondering why the background is full of hot pixels and dust shadows. Stretching before color-calibrating, then fighting a color cast that the stretch locked in. Over-doing noise reduction until the galaxy looks like melted wax. Over-sharpening until stars grow dark halos. And the big one: under-exposing total integration time, then trying to process a thin signal into a deep image — the square-root rule is undefeated.
If you are still choosing gear before any of this matters, start with the right scope for the job; my best telescopes for astrophotography guide and the camera comparison cover what actually feeds clean data into this pipeline. Good processing cannot rescue bad acquisition — but bad processing absolutely wastes good data, which is why this stage is worth learning properly.
Frequently Asked Questions
Do I really need calibration frames for astrophotography?
Yes for clean results. Darks remove hot pixels and thermal signal, flats remove vignetting and dust shadows, and bias frames capture the sensor read pattern. Skipping them leaves artifacts that no amount of later processing fully removes. Shoot at least 20-30 of each.
What order should I process an astrophoto in?
Calibrate, register, and stack first. Then, while the data is still linear, remove gradients, calibrate color, and deconvolve. Only then stretch the image. Noise reduction and cosmetic sharpening come after stretching. Reordering bakes in errors you cannot remove later.
Is free software like Siril good enough for astrophotography?
Yes. Siril and Deep Sky Stacker can stack and process excellent images at zero cost. The operator matters far more than the tool. Most beginners should start free and only pay for PixInsight or StarTools after hitting a real limitation.
Why does my stacked image look completely black?
That is normal. Deep-sky signal sits in the bottom few percent of the histogram of linear data. The image only looks like something after you apply a nonlinear stretch. Use a screen-transfer or autostretch preview to judge it before committing the stretch.
How much total exposure time do I need?
Signal-to-noise scales with the square root of total integration time, so doubling exposure only cuts noise by about 1.4x. Bright targets can work in one to two hours; faint galaxies and nebulae reward four to twelve hours or more, often gathered across several nights.
Can processing fix an underexposed image?
Only partially. Processing reveals signal you captured; it cannot create signal that was never recorded. Stretching thin data just amplifies noise. The real fix is more integration time. Tools that claim to add detail are smoothing noise, not recovering real structure.