Telescope maintenance is mostly restraint: keep the optics dry, keep the mirror aligned, keep dust off the moving parts, and clean glass only when it genuinely hurts the view. A well-kept scope holds its performance for decades — my 127mm Maksutov is past fifteen years old and still throws the same crisp Cassini Division it did on night one.
That last point is the one most new owners get backwards. They scrub a mirror that needed a puff of air, and they ignore a focuser that’s been seizing all winter. After years of running a Dob, an apo, an SCT, and that Mak side by side from a suburban Swedish lawn and a darker Nordic site, I’ve settled on a maintenance rhythm that’s more about not doing harm than about constant fussing. This guide is the whole picture, with links to the deep-dive spokes for each job.
The Maintenance Mindset: Optimize the Right Thing
The single most useful rule I can give you: a telescope is a system, and maintenance failures cluster at the boring end of it. Aperture chasing is the beginner trap — the same trap I see on my hydroponics and 3D-printing benches, where people upgrade the glamorous component and neglect the one that’s actually limiting them. Your views aren’t being held back by the coating on a mirror you cleaned last month. They’re held back by dew on the corrector, a finder that won’t hold zero, and collimation that drifted three sessions ago.
So the maintenance budget — your time and attention — should follow the failure modes, not the anxiety. In rough order of how often they actually ruin a night for me: dew, collimation drift, a stiff or sloppy focuser, mount problems, and only then optical grime. Cleaning the glass sits dead last because optics tolerate far more dust than people believe. A primary mirror can carry a surprising scatter of dust specks with no visible loss of contrast at the eyepiece; every cleaning, by contrast, risks a scratch that’s permanent.
Across the rest of this guide I’ll work through each maintenance task in that priority order, point you to the detailed walkthrough for each, and finish with a maintenance schedule and the small kit of tools worth owning.
Thermal Acclimation: The Free Performance Upgrade
Before any cleaning or collimation conversation, understand the one piece of “maintenance” that costs nothing and changes every session: letting the scope reach ambient temperature. A warm optic sitting in cold night air sheds heat as a turbulent boundary layer right in the light path — tube currents that smear fine detail far worse than a dusty mirror ever would.
The bigger the glass and the thicker the mirror, the longer it takes. My 12-inch Dob with its chunky primary wants a good hour outside on a cold night before it settles; the 100mm apo is essentially ready in fifteen minutes. In a Swedish winter, where the temperature gap between a heated house and the lawn can be 25°C or more, this is the difference between mush and a sharp planetary image. I carry the Dob out first and set up everything else while it cools. A small rear-cell fan on a Newtonian, run for the first half hour, pulls the cool-down time down considerably — that’s a maintenance upgrade worth more than any eyepiece swap.
Cleaning Optics: The Job You Should Do Least
When glass does need attention, technique matters more than frequency. The hierarchy is simple: a blower bulb removes the loose dust that accounts for most apparent grime; only when there’s bonded contamination — pollen, finger oil, dried dew spots with mineral residue — does wet cleaning earn its risk. I wet-clean a primary mirror perhaps once every couple of years, and a refractor or SCT corrector even less often, because the sealed front element of a closed tube simply doesn’t accumulate dust the way an open Newtonian does.
The fastest way to ruin a coating is to drag dust across it with a dry cloth. Air first, always. For the full procedure — the distilled-water-and-isopropyl mix, the cotton-ball float technique for mirrors, why you never touch a lens with anything you’d touch a mirror with — see my detailed walkthrough on cleaning telescope mirrors and lenses. The short version: if you can ask “does this really need cleaning?” and answer honestly, the answer is usually no.
One Nordic-specific note: pollen season here is brutal in late spring, and birch pollen in particular is a fine, sticky dust that does bond to a corrector left out overnight. That’s the one time of year I clean front glass on a schedule rather than on need.
Collimation: The Alignment That Makes or Breaks a Reflector
Collimation — aligning the optical elements so light focuses where it should — is the maintenance task that separates sharp reflectors from disappointing ones. A Newtonian or SCT even slightly out of collimation throws soft, comet-tailed stars and washes out planetary detail no amount of aperture can recover. Refractors are collimated at the factory and rarely need touching; reflectors drift with every transport bump and temperature swing.
My Dob gets a collimation check every single session, because the open tube and the long moment arm of a big mirror mean it never holds perfectly between nights, especially after a car trip to the dark site. It’s a two-minute job once you’ve done it fifty times. The 8-inch SCT is far more stable but still benefits from a star-test tweak a couple of times a season. For the complete process — laser vs. Cheshire, primary vs. secondary adjustment, and the star test that confirms it — read collimating a reflector telescope, and for the broader treatment across all designs see the telescope collimation guide.
The mistake I see most is people fearing collimation and therefore avoiding it, which guarantees they observe through a misaligned scope for months. It’s reversible, it’s quick, and a collimated 6-inch beats a misaligned 10-inch on any planet. Learn it early.
Storage and Transport: Where Scopes Actually Get Damaged
More telescopes are harmed sitting in a garage or bouncing in a car boot than at the eyepiece. The two enemies are moisture and mechanical shock. A scope stored in an unheated, humid space grows mould on the coatings and corrosion on the mechanics; one packed loose for transport arrives with a knocked-out finder and, on a Newtonian, a primary that needs recollimating before you’ve even unpacked.
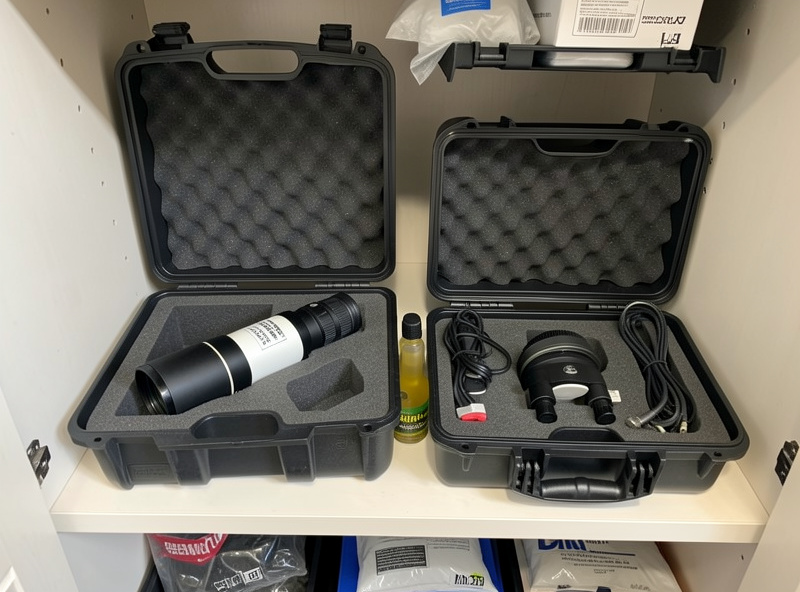
I store my refractor and SCT in foam-lined hard cases in the coolest dry room in the house, caps on, with a few silica gel packs that I recharge in a low oven every couple of months. The Dob lives assembled under a breathable cover in an unheated but dry outbuilding — never sealed in plastic, which traps condensation against the optics. The full set of rules for both keeping a scope between sessions and moving it safely is in my telescope storage and transport guide.
Dew and Moisture Control: The Nightly Battle
Dew is the maintenance problem you fight in real time, every clear night, and at my latitude it’s relentless. Radiative cooling drops exposed glass below the dew point and a film forms on the corrector or eyepiece, killing the view in minutes. The SCT and the Mak, with their exposed front correctors pointing at the cold sky, are the worst offenders; my open-tube Dob and the dewshield-protected apo fare better.
The fix is prevention, not wiping — you never want to be rubbing a wet optic in the field. A dew shield buys time; a dew heater band run off a field battery is the real solution, holding the glass a few degrees above ambient so condensation never forms. After a night out, the genuinely important maintenance step is drying: I leave caps off and let everything reach room temperature and dry fully before casing it, because sealing a damp scope is how coatings get fungus. The complete approach — shields, heater bands, power budgeting, and the post-session dry-out — is covered in dew prevention for telescopes.
Mechanical Maintenance: Focusers, Mounts, and Moving Parts
The optics get the attention; the mechanics get the neglect, and then a focuser racks roughly under an imaging camera and ruins a session. Mechanical maintenance is unglamorous and mostly preventive.
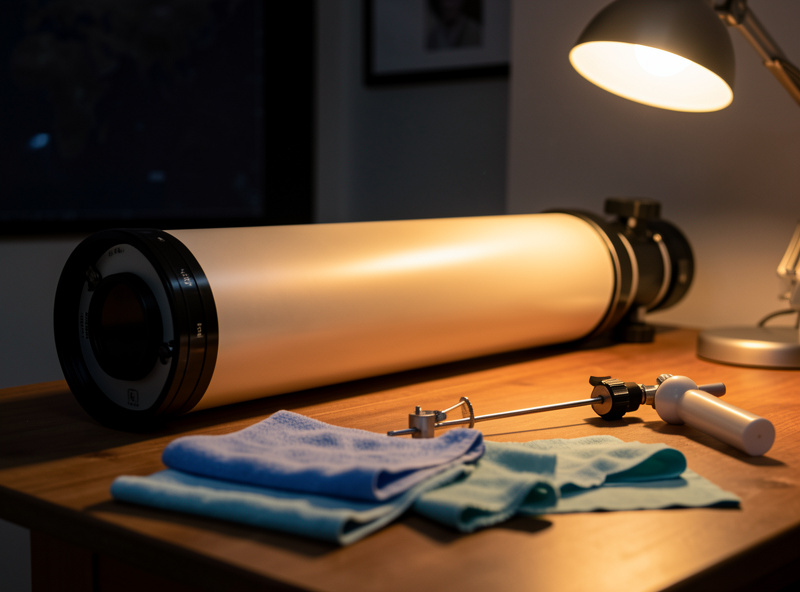
The focuser is the part you touch most. A Crayford that slips under a heavy eyepiece usually just needs its tension screw adjusted, not replacing; a rack-and-pinion that’s gone gritty wants the old hardened grease cleaned out and a thin film of fresh synthetic lubricant. I clean and re-grease the Dob’s focuser about once a year — Swedish cold thickens cheap grease until the focus action turns to glue in January.
Mounts are where beginners under-spend and then under-maintain. My EQ6-R Pro equatorial gets its worm-gear mesh checked at the start of each imaging season and the slow-motion controls kept clean; backlash that creeps in shows up immediately as poor guiding RMS. Keep electrical contacts clean, keep the counterweight shaft and clutches free of grit, and don’t store a GoTo mount with batteries inside to leak. For the bigger picture on choosing and living with mounts, the telescope mount guide and telescope mount types guide cover the ground, and polar alignment is the recurring setup task on any equatorial.
Finders drift too. A red-dot or finder scope that won’t hold its zero between sessions is usually a loose bracket, not a faulty finder — see the finder scope and red dot sight guide. And eyepieces, which are half your optical system, want their own light care: blower for dust, a careful lens-pen or breath-and-microfiber for eye-side smudges, and storage in a sealed case with desiccant. The eyepiece guide goes deeper on the kit itself.

Restoring a Vintage Telescope
At the far end of maintenance is restoration — taking a neglected old scope and bringing it back to working order. The classic 1970s–80s Japanese refractors and the older orange-tube SCTs turn up at estate sales and online for very little, and a surprising number need only cleaning, fresh grease, and patience rather than new parts. The optics on those old long-focus achromats were often excellent and the coatings, if stored dry, survive remarkably well.
Restoration is its own discipline — assessing whether the optics are worth saving before you spend a weekend on the mechanics, sourcing or improvising parts for discontinued mounts, and knowing when a “bargain” is actually a haze-fungused write-off. I walk through a full project, from triage to first light, in refurbishing and restoring a vintage telescope. It’s the most satisfying maintenance there is: the same setup-and-tweak instinct that drives the rest of my benches, applied to glass that’s older than I am.
Reading Your Scope: Diagnose Before You Fix
Half of all “maintenance” is actually misdiagnosis. People wet-clean a mirror because the view looked soft, when the real culprit was a warm tube or unsteady air. Before you touch anything, learn to read what the scope is telling you — it saves both wasted effort and the risk of a cleaning scratch you never needed to incur.
The single best diagnostic is the star test. Centre a moderately bright star, rack the focuser slightly inside and then outside of focus, and study the out-of-focus disc. A well-collimated, acclimated scope shows concentric rings, the same defocus pattern on both sides of focus, with the central obstruction shadow dead centre. If that shadow sits off to one side, you’ve found collimation drift. If the rings boil and writhe, that’s atmospheric seeing or a tube that hasn’t cooled — neither is fixed by cleaning. If one side of focus looks crisp and the other mushy, you may be looking at thermal currents or, occasionally, genuine optical issues.
Learn to separate the three things that masquerade as “dirty optics”: seeing (the air boiling, worst when you observe over a warm roof or low to the horizon — see my notes on atmospheric seeing for planetary observing), thermal currents (the tube hasn’t reached ambient), and dew (a soft, foggy loss of contrast that worsens through the night). Only after ruling those out should you suspect the glass itself. In my logs, genuine “the optics need cleaning” nights are rare; the other three explain the vast majority of disappointing views.
The Secondary, the Tube Interior, and Stray Light
Maintenance attention concentrates on the primary mirror or the front lens, but the parts you can’t see do quiet damage. On a Newtonian, the small diagonal (secondary) mirror sits right in the light cone and shows dust far more than the primary does — yet it’s awkward to reach, so it gets ignored. I blow it gently when I have the tube open for collimation and wet-clean it only on the same once-every-couple-of-years cycle as the primary, handling it by its holder, never the face.
Inside the tube, two things degrade contrast: dust settling on the baffles and reflective bare metal where flocking has peeled or was never fitted. A reflector tube with shiny interior walls scatters stray light across the field and greys out faint detail. Adding self-adhesive flocking material to the inside of an open tube — particularly opposite the focuser — is one of the cheapest contrast upgrades there is, and it’s a maintenance job, not just a modification. On the refractor and the SCT, internal baffling is sealed and maintenance-free, which is part of why closed tubes hold their contrast with so little fuss.
Light leaks matter too. A focuser drawtube that lets stray light past, or a finder bracket hole that wasn’t blanked, throws glare into the eyepiece exactly when you’re chasing a faint galaxy. I check for leaks the lazy way: cap the front, point a torch around the tube in a dark room, and watch for light reaching the focuser.
Coatings: What They Are and When They’re Failing
The reflective and anti-reflective coatings are the part owners worry about most and understand least. A mirror’s aluminium coating with its protective overcoat is tough enough to survive years of careful blowing and the occasional gentle wet clean; what kills it is abrasion from dry wiping and, in storage, fungus and oxidation from trapped moisture. Modern enhanced coatings last a decade or more of normal use without measurable loss.
Know the difference between cosmetic and functional coating damage. A few pinprick spots where the overcoat has aged — what observers call “coating freckles” — scatter a trivial amount of light and are not worth re-coating for. Widespread hazing, a milky bloom across the surface, or fungus tendrils that have etched the coating are functional failures that genuinely cost you light and contrast. Re-coating a primary mirror is a specialist job and only worth it on a quality optic; on a cheap mirror the cost approaches a new scope. This is exactly the calculus I work through when assessing a vintage scope for restoration — the optics decide whether the project is worth starting.
The practical lesson for maintenance: protect the coatings by controlling moisture and resisting the urge to clean, and they will outlast your interest in the hobby. The coatings on my fifteen-year-old Mak are essentially as-new because that sealed tube has never needed opening.
Electronics, Power, and GoTo Care
A modern setup is half optics, half electronics, and the electronics fail in their own ways. GoTo hand controllers, motor drives, and the dew-heater and camera-cooling loads on an imaging rig all depend on clean, stable power — and cold Nordic nights are hard on batteries, which lose a chunk of their usable capacity as temperature drops.
The recurring maintenance items: keep every electrical contact clean and corrosion-free (a smear of dielectric grease on outdoor connectors pays off), never store a GoTo mount or hand controller with alkaline batteries inside — they leak and destroy the contacts — and budget your field power honestly. A dew heater, a cooled camera, a guide camera, and a mount running all night draw more than people expect; I run everything off a dedicated LiFePO4 field battery rather than risk a car battery, and I size it for the longest winter night. The full treatment of field power for an imaging rig is in my piece on all-night astrophotography power and the broader 12V LiFePO4 power tanks comparison.
Cables are the unglamorous failure point. Cold-stiffened cables that get tugged as the mount slews cause intermittent faults that look like software bugs; dressing the cables properly and leaving a service loop is genuine preventive maintenance on an imaging setup. And firmware — keeping a GoTo handset and an autoguider’s software current — is the one “maintenance” task you do from a warm desk, well worth it before a season starts so you’re not troubleshooting under the stars.
Common Maintenance Mistakes I See
After years of watching new owners — and making most of these mistakes myself early on — a few patterns repeat often enough to call out directly.
Cleaning far too often. The biggest one. Every clean is a risk and most are unnecessary. If you find yourself reaching for cleaning fluid more than once or twice a year, you’re almost certainly doing harm rather than good.
Compressed-air cans on optics. They can spit liquid propellant onto a coating and freeze-mark it. A hand blower is the only air you should put on glass.
Storing a scope damp. Casing up a dew-soaked telescope after a night out, sealed against airflow, is the single fastest route to fungus on the coatings. Let everything dry fully, caps off, before it goes away.
Fearing collimation. Avoiding it doesn’t keep the scope aligned; it just guarantees months of soft views. It’s quick and reversible — learn it.
Over-tightening everything. Cranking down collimation screws, clamp knobs, and mirror clips stresses and pinches the optics, producing astigmatism — pinched-optic stars look triangular at focus. Snug, not forced.
Neglecting the mount. A beautifully maintained OTA on a sticky, backlash-ridden mount is a bad night waiting to happen. The mount deserves equal attention.
A Nordic Observer’s Maintenance Calendar
Maintenance isn’t evenly spread through the year, and at high northern latitudes the calendar is unusually lopsided. The Swedish observing year shapes my maintenance rhythm in a way a mid-latitude guide would never describe, and if you observe anywhere with real seasons it’s worth thinking the same way.
Late autumn and winter is the heart of the season here — long, cold, gloriously dark nights, and the time the gear works hardest. This is when the cold-weather failures show up: grease stiffening in focusers and mounts until the action turns to glue, batteries losing capacity, dew and frost forming the moment you stop fighting them. My maintenance focus in winter is operational: dew heaters checked and powered, field battery sized for a long night, focuser running on cold-rated synthetic grease, and rigorous post-session drying because the temperature swing from a -10°C lawn into a heated house dumps condensation onto every surface. I do almost no cleaning in winter — it’s the wrong time to open a tube.
Late spring brings the one cleaning job I actually schedule: pollen. Birch and grass pollen here is a fine, sticky film that bonds to any front element left exposed, and it’s abrasive if you try to blow it off dry. A careful wet clean of correctors and any exposed lens at the end of pollen season is one of the few calendar-driven cleanings I do.
Summer is the dead season for darkness — for weeks around midsummer there’s no true astronomical night at this latitude at all — and that’s exactly why it’s the right time for the deep maintenance you can’t do mid-season. This is when I strip and re-grease focusers, service the mount’s worm gears and clutches, do any once-every-couple-of-years wet clean of a primary mirror with the tube fully apart, recharge all the silica gel, inspect every coating in good daylight for the first signs of fungus, and tackle a vintage restoration project. Doing this in summer means the gear is dialled in and ready when the dark returns in autumn, rather than losing a precious clear winter night to a maintenance discovery.
The polymath crossover applies here as much as anywhere: the same instinct that has me servicing the hydroponics gear in the off-season runs the telescope bench too. Maintain in the dead time so the gear is ready for the good time. The Swedish summer that’s useless for visual astronomy is a gift for the maintenance bench.
A Realistic Maintenance Schedule
You don’t need to do everything constantly. Here’s the rhythm I actually keep across my scopes — adjust frequency up for an open-tube Newtonian and down for a sealed refractor.
| Task | Frequency | Tools / Notes |
|---|---|---|
| Thermal acclimation | Every session | Carry scope out first; rear fan on Newtonians |
| Collimation check | Every session (reflector); 2–3 per season (SCT) | Cheshire or laser; confirm with star test |
| Dew management | Every clear night | Dew shield plus heater band; dry out after |
| Blow dust off optics | As needed (monthly-ish) | Rocket blower only, no contact |
| Focuser clean and re-grease | Once a year | Synthetic grease; adjust tension before replacing |
| Mount gear / clutch check | Start of each season | Check worm mesh, clean contacts, no stored batteries |
| Wet-clean mirror | Every 1–2 years (if at all) | Distilled water plus isopropyl, float method |
| Wet-clean lens / corrector | Rarely; pollen season here | Lens-safe fluid, never mirror technique |
| Silica gel recharge | Every couple of months | Low oven; keep cases dry |
| Full storage check | Seasonally | Inspect coatings for fungus, mechanics for corrosion |
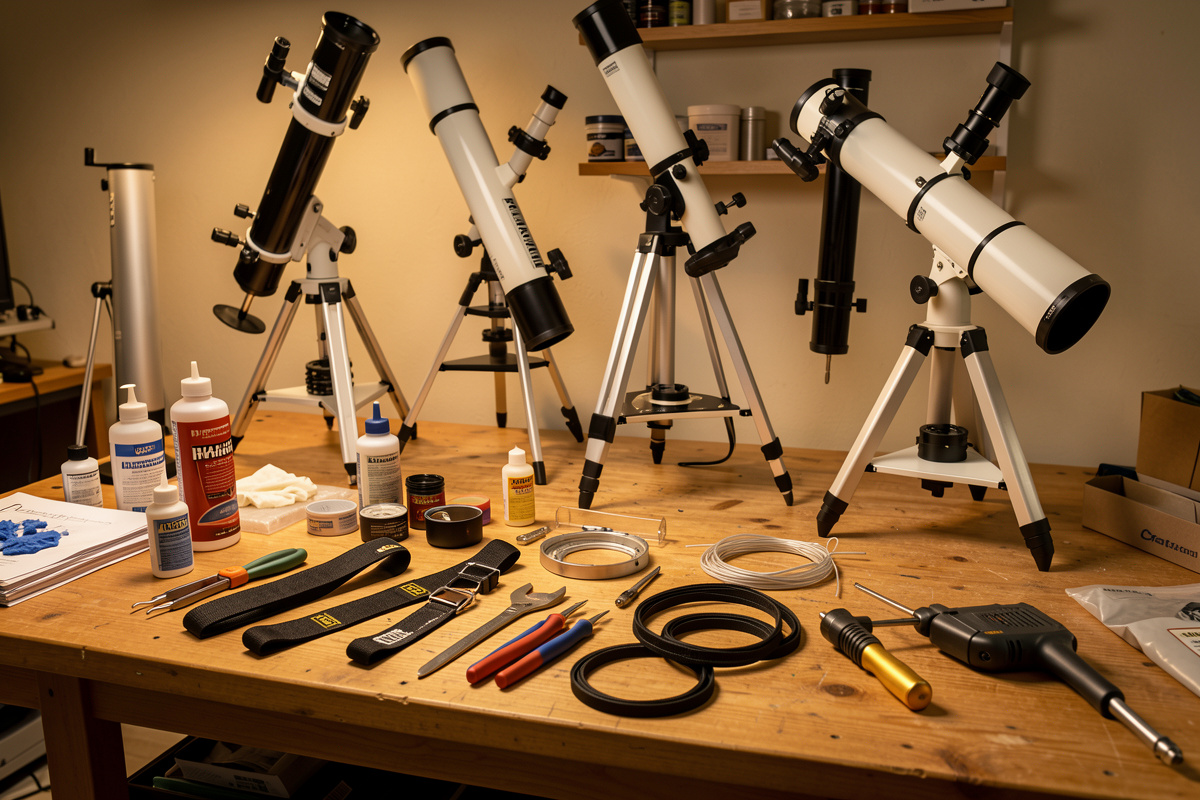
The Maintenance Kit Worth Owning
You can maintain a telescope properly with a small, cheap kit — and most of the expensive “telescope cleaning kits” sold online are overpriced bundles of things you can buy better separately. What I actually keep in the maintenance drawer:
A large rocket-style air blower does ninety percent of all optical cleaning and should be the first tool you buy — never compressed-air cans, which can spit propellant onto coatings. For the rare wet clean, reagent-grade 99% isopropyl alcohol cut with distilled water, and proper lint-free swabs. For collimation, a Cheshire collimation eyepiece is the cheapest, most reliable tool there is — a laser is faster but only if it’s itself collimated. For dew, a dew heater strap and controller earns its money on the first humid night. And a tub of synthetic PTFE grease for focusers and mount gears that won’t gum up in the cold. As an Amazon Associate I earn from qualifying purchases.
That’s the whole kit. Resist the urge to buy more — the discipline of maintenance is knowing how little intervention a good scope actually needs.
Frequently Asked Questions
How often should I clean my telescope mirror?
Far less often than most people think. Blow loose dust off with a rocket blower as needed, but wet-clean a primary mirror only every one to two years, and only when bonded contamination is visibly hurting contrast. A mirror tolerates a lot of dust; every wet clean risks a permanent scratch.
Does dust on a telescope mirror ruin the view?
No. A scatter of dust specks on a primary mirror has almost no visible effect on contrast at the eyepiece. Dew, misalignment, and a warm optic degrade your view far more than dust does. Clean only when there is bonded grime, not loose dust.
How do I stop dew forming on my telescope?
Prevention beats wiping. A dew shield delays it; a dew heater band powered by a field battery, holding the front glass a few degrees above ambient, stops it forming at all. SCTs and Maksutovs with exposed correctors need this most. Never rub a wet optic in the field.
How often does a reflector need collimating?
Open-tube Newtonians and Dobsonians drift with transport and temperature, so check collimation every session; it takes about two minutes with a Cheshire once you are practiced. SCTs are far more stable and usually only need a star-test tweak a few times per season. Refractors essentially never need it.
Can I store my telescope in a cold garage or shed?
A cold space is fine if it is dry; humidity is the real enemy. Avoid sealing a scope in plastic, which traps condensation against the coatings and grows fungus. Use silica gel in cases, keep caps off until the scope has dried after a session, and inspect coatings seasonally for mould.
Is it worth restoring an old second-hand telescope?
Often yes. Many vintage Japanese refractors and older SCTs need only cleaning and fresh grease, and their optics were frequently excellent. Assess the optics first: light surface dust and good coatings are savable, but internal fungus or deep scratches usually make a cheap scope a write-off rather than a project.